A totally fun and SIMPLE craft, the fleece tie blanket makes a great gift or project for young children because it lets them be hands on and is almost impossible to mess up! Because the blanket is totally customizable in terms of color and material, this craft is perfect for anyone! Follow this tutorial for easy instructions for constructing your very own fleece tie blanket!
Materials:
- 1.5-2.5 Yards of fleece (any color, depending on the size desired)
- Sharp scissors, preferably fabric scissors
- Ruler or measuring tape
- Hands!
Cost:
$20-$40 depending on fleece selection
Project Duration:
Less than one hour
Step One: Choosing your fabric
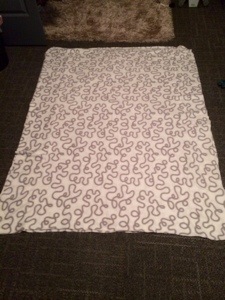
In general, these blankets work best with fleece because it is a very stretchy fabric that is easily cut and manipulated. Fleece can be purchased by the yard at almost any craft store or Walmart for around $7/yard for solid colors and some prints, licensed designs will cost more. Be sure to look out for coupons in your craft store’s weekly ad; fleece goes on sale often! I opted to use the same color for both sides of my blanket, but it is very common to have each side be a separate color or to have one side patterned and select a color within the pattern for the backing. My fleece, shown below, was purchased at IKEA for only $1.99 per 1.75 yards.
Step Two: Preparation and Cutting
In an area with enough working space, lay out both pieces of your fleece one on top of the other, making sure all sides and corners match. If your craft store did not do a great job of cutting the pieces evenly, trim the edges carefully to ensure they are even on the top and bottom pieces.
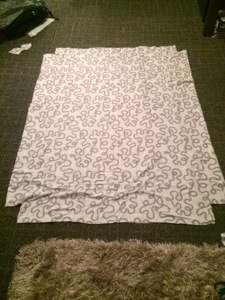
Using your sharp or fabric scissors, your first cut will be out of the four corners. Essentially, you need to cut a square out of each corner with a width of approximately 4-5 inches depending on how long you want your ties to be. Use a ruler or measuring tape to measure the corners out if you aren’t comfortable estimating. My fabric had rounded edges, so the cutout didn’t resemble a perfect square. After all four corners have been cut out, make sure both pieces of fleece are still lined up with one another. As shown in the photo below, the center of the fleece is not laying perfectly flat; in order to have the corners match perfectly, I had to bunch up some of the fabric on the sides — this can be fixed at the end of the project by stretching out the blanket!
The next cuts to be made are the actual sections you will be tying off. Starting on any of the sides of the blanket, cut 1-1.5 inch sections in width that are approximately 4-5 inches long, corresponding with the length you cut out of the corners. Make sure the top and bottom layers of fabric are still matched up as you continue to cut. Don’t worry about measuring out the width of each section, just do your best to stay within the 1-1.5 inch range. Any imperfections will be difficult to notice when the edges are tied off. After cutting strips around the four edges, your blanket should resemble the image below.
Step Three: Tying Off the Edges
Beginning on one corner of the blanket, take matching cuts from the top and bottom layers of fabric and double knot them. Repeat until all strips are tied. Be mindful of keeping each pair of strips together as you tie. This part is especially fun (and easy!) for kids.
 After all the strips are tied, your blanket’s corners may seem to be rounded and bunched up, as shown above. By stretching out the blanket by having people pull on opposite ends, the blanket will return to its normal square or rectangular shape. After you’ve stretched out the corners, enjoy! The blanket is complete!
**Caring for Fleece Blanket**
Because your blanket may inevitably become dirty through use, follow these instructions to preserve the quality of your handmade blanket!
Always wash your fleece blankets in cold water with by itself or with like fabrics. Stop cleaning may harm the fabric and cause pilling due to excess rubbing. Use the gentle cycle when washing fleece fabrics because excess friction is a major factor in the pilling. Never use bleach or fabric softeners.
Use the low heat setting and the gentle cycle of your tumble dryer as fleece is sensitive to heat. Do not iron out any wrinkles.


